A flight line defines where the UAVSAR radar is acquiring data.
Here, the desired radar image swath is chosen either by selecting the along-track end points of the image swath, or by choosing an image swath along-track center, heading, and length. The software then calculates the cross-track width of the image swath, and where the aircraft needs to fly to acquire the image swath.
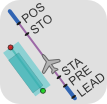
There are two components of each flight line: at the beginning and end of each image swath, for a short time, the radar is transmitting but imagery can not be produced; in between these two areas imagery may be produced.
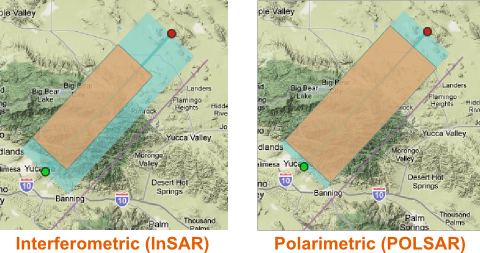
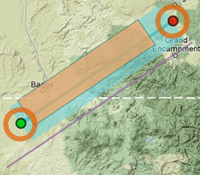
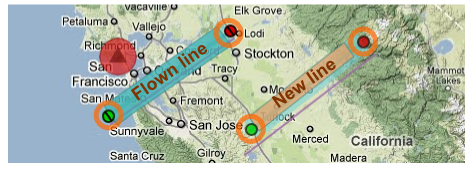
This processable image swath is slightly different depending on whether the objective is to obtain interferometric or polarimetric data. The image swaths that will be obtained after image processing (in orange below) are shorter and sometimes narrower than the radar illuminated ground swaths (in blue below). This is indicated on the map.
When in UAVSAR's standard polarimetric imaging mode, the processed image swaths will be shorter than the illuminated ground swaths, with 3 km and 7 km lost on each end. When it is desired to obtain a repeat pass interferogram with two passes by UAVSAR, the processed interferogram will be shorter and narrower (worse case, 6 km is lost in the near range, with 6 and 14 km lost at each end of the image swath).
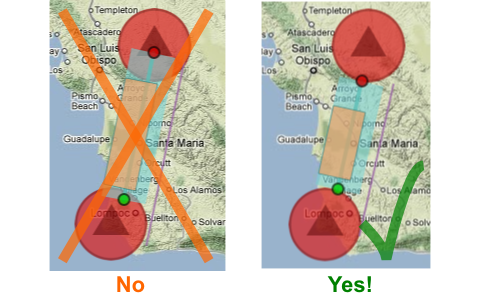
There are just under 100 L-band long range radars operated by the FAA to track aircraft movement in US airspace. While the L-band UAVSAR radar is transmitting, its predicted image swath may not pass within 10 nautical miles of the location of an FAA Long Range Radar Site.
These exclusion zones are indicated by filled in red circles on the map. No part of the image swath may cross these exclusion zones.
Before each flight line commences, the aircraft must line up for the data acquisition and prepare the radar for operation. After each flight line, the radar is not transmitting, but the aircraft continues along the same path while operations cease. These distances are automatically included in the flight path.
Add a New Flight Line
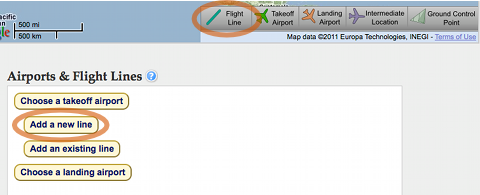
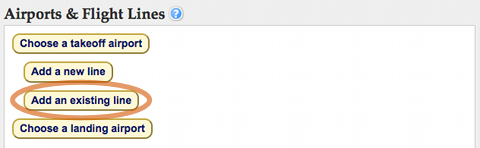
To start creating a flight line, click "Flight Line" in the map toolbar or the "Add a new line" button below the map.
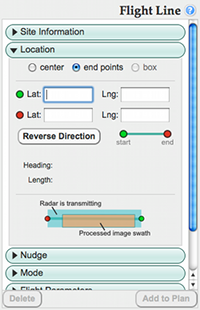
A column with different sections will appear to the right of the map. To open and close (collapse/expand) each section, click on the section's name. The details of each flight line may be viewed and edited here.
Column Descriptions
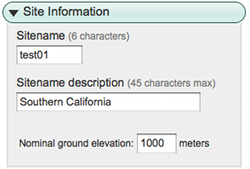
Site Information: Please enter site specific information for each line: a 6 character sitename and a sitename description. If a sitename is not entered, a default one will be chosen. This sitename will subsequently be used to identify the processed image products.
Imported lines and lines added to the flight plan have an assigned, unique flight line ID. Copied lines will keep the same ID.
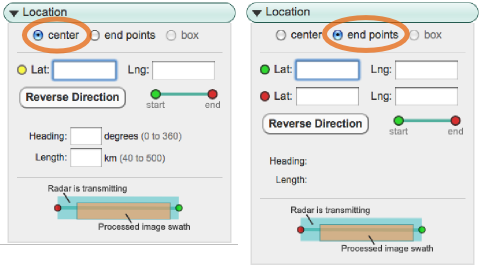
Location: The flight line heading, length, and location may be entered by either drawing their location on the map, or by manually entering coordinates in the lat/lng text boxes, as seen below. The flight line direction may be reversed by clicking the indicated button. Lines must have the radar transmitting at least 40 km, but less than 500km.
There are two methods currently implemented for drawing an image swath and you may switch between them:
1) Center method: Click on the map once to draw the center of the image swath on the map. By dragging the start and end points in the map, you may change the heading and length of the line. You may manually edit the values in the text input boxes.
A video demonstration may be viewed here (no sound). We recommend using full screen and watching in HD.
2) End points method: Click on the map twice to draw the two endpoints of the image swath. You may change the heading and length of the line by dragging the endpoints in the map to the desired locations or by editing the lat/lngs in the textboxes.
A video demonstration may be viewed here (no sound). We recommend using full screen and watching in HD.
Nudge: A flight line may be laterally 'nudged' in any direction by the distance specified in the textbox.
A flight line can also be vertically 'nudged' by the given number of meters.
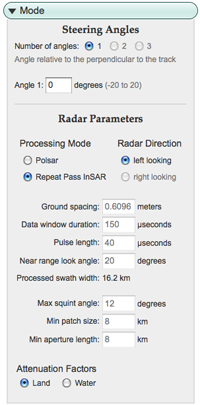
Mode: For most users, the default values should be used. Here you can change the processing mode to Polsar or InSAR, which willl change the width of the swath.
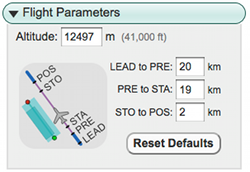
Flight Parameters: For most users, the default values should be used.
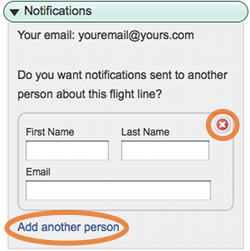
Notifications: Optional. Please indicate contact information for notification of changes to the flight request status. More contacts can be added by clicking the "Add another person" link. A contact can be deleted by clicking the remove button (x) at the top right of corner of the notification.
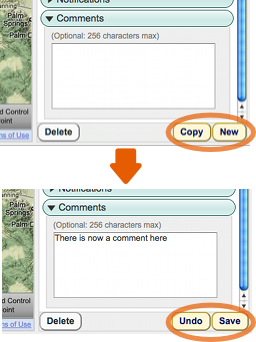
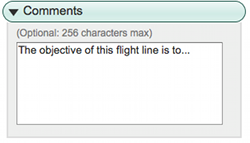
Comments: Optional. Please describe the objective of the flight line.
If a flight line in the plan is currently selected and you want to make a new flight line, click "Flight Line" in the map toolbar or the "New" button to the right of the map.
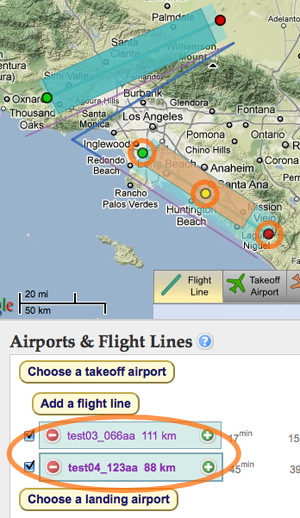
Flown Lines
Flown flight lines (that have been imported) are disabled because they should not be modified. They have black lines through their end points on the map, while new lines do not.
However, there is a hidden trick to modify flown flight lines. Uncheck the checkbox next to the desired line in the drag & drop area below the map, then check it again. This will allow you to change the flown flight line.
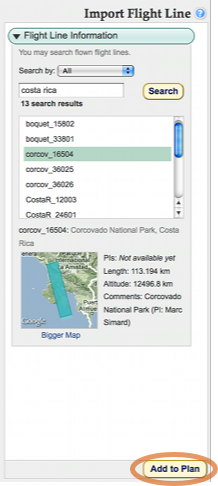
Add an Existing Flight Line
To add an existing line, click on the "Add an existing line" button below the map.
Use the search box and the drop-down menu which appear to the right of the map to search for flown flight lines under different criteria. After searching, select specific results which appear below the search box until you find the desired flight line.
Click the "Add to Plan" button to add the existing flight line to the flight plan.
Update a Flight Line
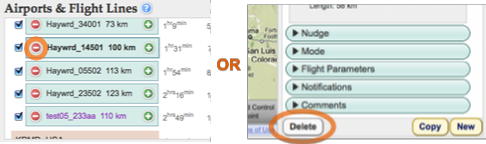
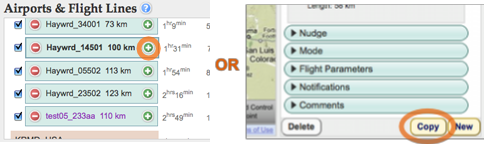
To update a flight line, it must be selected first. There are a couple ways to select an existing flight line: click one of the flight line markers (start, center, or end points) in the map or click the flight line by name in the "Airports & Flight Lines" drag & drop list below the map.
A flight line's image swath is orange when selected, and blue when unselected.
Once the desired flight line is selected, you can now change its information (sitename, radar parameters, comments, etc) to the right of the map. To change the location of the flight line, drag the flight line markers (start, center, or end points) in the map or change the lat/lng coordinates to the right of the map.
If any information is changed, the "Undo" and "Save" buttons will appear where the "Copy" and "New" buttons used to be. "Undo" will revert all your last changes and "Save" will save all those changes.
A video demonstration may be viewed here (no sound). We recommend using full screen and watching in HD.
Delete a Flight Line
To delete a flight line, it must be selected first (refer to "Update a Flight Line" above). There are a couple ways to delete it: click the remove button (-) to the left of the flight line listed below the map or the "Delete" button to the right of the map.
Copy a Flight Line
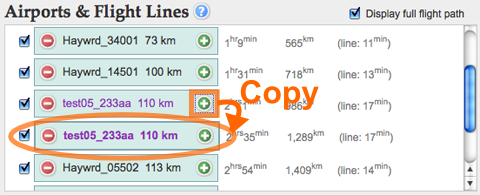
To copy a flight line, it must be selected first (refer to "Update a Flight Line" above). There are a couple ways to copy it: click the copy button (+) to the right of the flight line listed below the map or the "Copy" button to the right of the map (which only appears if you have not made any changes to the current flight line).
A copy will appear just after the original flight line in the list below the map.
 Jet Propulsion Laboratory
California Institute of Technology
UAVSAR Home
Jet Propulsion Laboratory
California Institute of Technology
UAVSAR Home
 Before each flight line commences, the aircraft must line up for the data acquisition and prepare the radar for operation. After each flight line, the radar is not transmitting, but the aircraft continues along the same path while operations cease. These distances are automatically included in the flight path.
 Site Information: Please enter site specific information for each line: a 6 character sitename and a sitename description. If a sitename is not entered, a default one will be chosen. This sitename will subsequently be used to identify the processed image products.
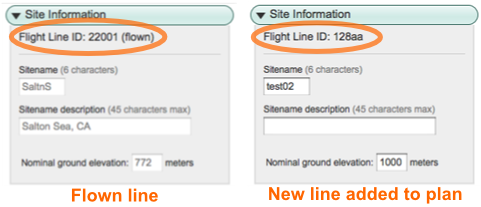
 1) Center method: Click on the map once to draw the center of the image swath on the map. By dragging the start and end points in the map, you may change the heading and length of the line. You may manually edit the values in the text input boxes.
 2) End points method: Click on the map twice to draw the two endpoints of the image swath. You may change the heading and length of the line by dragging the endpoints in the map to the desired locations or by editing the lat/lngs in the textboxes.
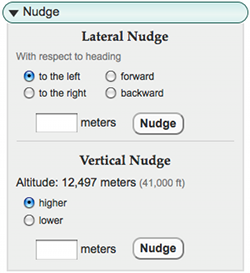

 To update a flight line, it must be selected first. There are a couple ways to select an existing flight line: click one of the flight line markers (start, center, or end points) in the map or click the flight line by name in the "Airports & Flight Lines" drag & drop list below the map.