The UAVSAR Web Flight Planning Tool enables you to do your own flight planning and time estimation through an interactive Google Maps interface.
Quick Start
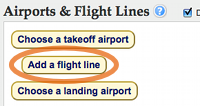
1. Click on the "Add a flight line" button below the map.
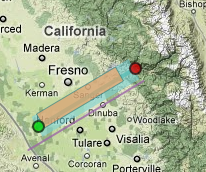
2.Zoom into California on the map.
3. Click on the map twice to draw the two endpoints of the image swath.
4. Click on the "Add to Plan" button to the right of the map.
5. Click the "Choose a takeoff airport" button below the map.
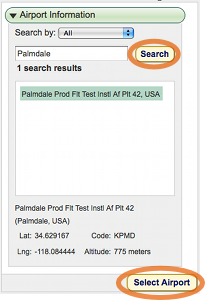
6. Enter "Palmdale" in the search box that appears to the right of the map and click "Select Airport" to add the airport to the plan.
7. Click the "Choose a landing airport" button below the map. Search for another California airport and click "Select Airport".
8. Click "Create Report" at the bottom right corner of the screen to view the full flight plan report.
Overview
Some of the main features of the web tool include drawing flight lines on the map, nudging them, adding them to the current flight plan, and reordering them. You can also add ground control points and search and select takeoff, landing, and intermediate airports.
As the flight plan is constructed, all of its components are constantly being saved and the estimated flight times are updated on the fly.
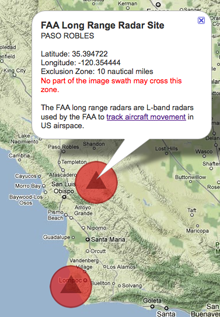
FAA Long Range Radars
There are just under 100 L-band long range radars operated by the FAA to track aircraft movement in US airspace. While the L-band UAVSAR radar is transmitting, its predicted image swath may not pass within 10 nautical miles of the location of an FAA Long Range Radar Site.
These exclusion zones are indicated by red circles on the map. Click on the red triangles in the circles to find more information about that particular site. No part of the image swath may cross these exclusion zones.
Navigation
This is the basic map layout and each of the main regions are explained below.
Instructions
You can find instructions at the top of the map.
As you navigate through the web tool and start creating and modifying different items (flight lines, airports, etc), these instructions will be updated with pertinent information.
Map Toolbar
The toolbar at the bottom of the map allows you to select different items that you want to add to the flight plan.
The currently selected item is highlighted in yellow and that specific item's information appears to the right of the map in the "Item Info" area.
Item Info
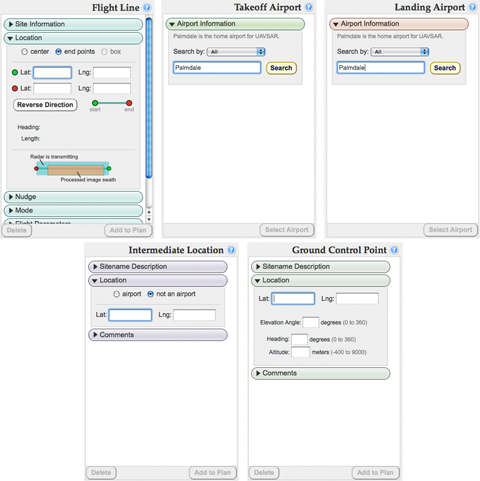
When an item is selected, the item's information will appear in the column to the right of the map. These are all the possible columns.
Each item has expandable/collapsible sections (e.g. "Sitename Description", "Location", "Comments", etc) that open and close when they are clicked. Information can be entered and saved in these sections.
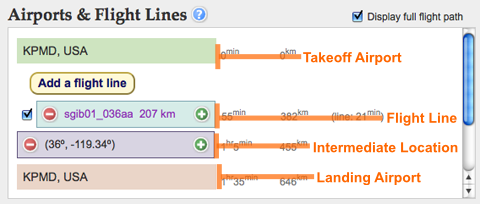
Drag & Drop Area
You can view your entire flight plan and flight time estimates in this area below the map: all airports, flight lines, intermediate locations, ground control points, and imported KML files.
Flight lines and intermediate locations can be rearranged in the flight planning by dragging and dropping the elements. You can find more information, including a demo, in the Airports & Flight Lines help section.
Plan Info
In the bottom right corner of the screen, flight plan information can be entered. Once your flight plan is complete, this is where a report can be generated that summarizes the full flight. More information can find more information in the Flight Plan help section.
Tutorial
A video demonstration may be viewed here (no sound). We recommend using full screen and watching in HD.
 Jet Propulsion Laboratory
California Institute of Technology
UAVSAR Home
Jet Propulsion Laboratory
California Institute of Technology
UAVSAR Home
 1. Click on the "Add a flight line" button below the map.
 3. Click on the map twice to draw the two endpoints of the image swath.
 5. Click the "Choose a takeoff airport" button below the map.
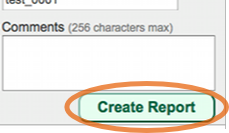
 There are just under 100 L-band long range radars operated by the FAA to track aircraft movement in US airspace. While the L-band UAVSAR radar is transmitting, its predicted image swath may not pass within 10 nautical miles of the location of an FAA Long Range Radar Site.
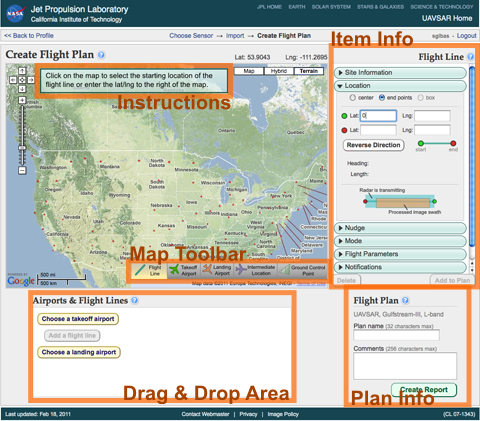

 In the bottom right corner of the screen, flight plan information can be entered. Once your flight plan is complete, this is where a report can be generated that summarizes the full flight. More information can find more information in the Flight Plan help section.